Your Snoozefest Strength-Training Routine Is Boring Your Muscles Too Shutterstock
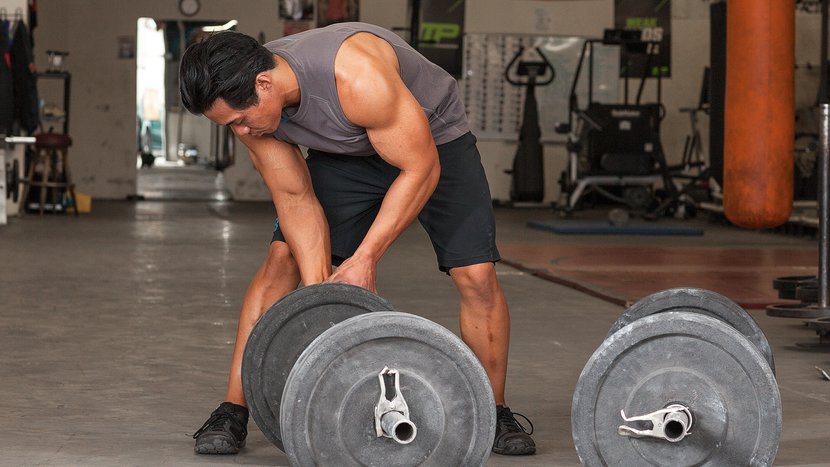
More weight means more muscle, right? But new research published in the International Journal of Sports Medicine shows that alternating between light and heavy weights may be the best way to build muscle and strength.
For the study, researchers followed 19 men as they completed eight-week strength training programs. Half followed a traditional three-day-per-week strength program, performing each of their sets with an amount of weight that allowed them to complete eight to 12 reps. The rest switched up their weights: They lifted near-max weight for two to four reps on the first workout day, moderate weight for eight to 12 reps on the second day, and light weight for 20 to 30 reps on the third day.
While both groups boasted big benefits, the lifters who varied their weights enjoyed an increase in bicep and triceps size and improved muscle endurance. They also experienced more gains in how much they could bench press. (Researchers expect similar results in women.)
Why? Lifting both extremely light and extremely heavy weight trains a wider range of muscle fibers than lifting moderate weights alone, says Brad Schoenfeld, Ph.D., C.S.C.S., assistant professor of exercise science at Lehman College in New York, and lead author of the study.
Let us explain: Your muscle fibers come in two flavors: type 1 and type 2. While type 1 fibers are best recruited with light loads and are in charge of endurance exercise, like lifting small dumbbells for 20 to 30 reps, it takes heavy weights to spring your type 2 fibers into action, he says. By tapping both types muscle fiber types, you get all of their benefits: size, strength, and endurance.
To get the most from your strength workouts, Schoenfeld recommends performing your exercises with a range of weight and reps. But you don't need to switch things up on a daily basis to get the benefits of varied-weight workouts, he says. Alternating weights on a weekly or even monthly basis will score you similar benefits—plus, they make your workouts easier to track.
One week or month, try lifting near-max weights for one to five reps per set. The next, transition to moderate weights for eight to 12 reps per set. For your last cycle, lift light weights for 15-plus reps per set, he says. Then, bask in the glory of your awesome muscles.
Original article and pictures take www.fitnessmagazine.com site
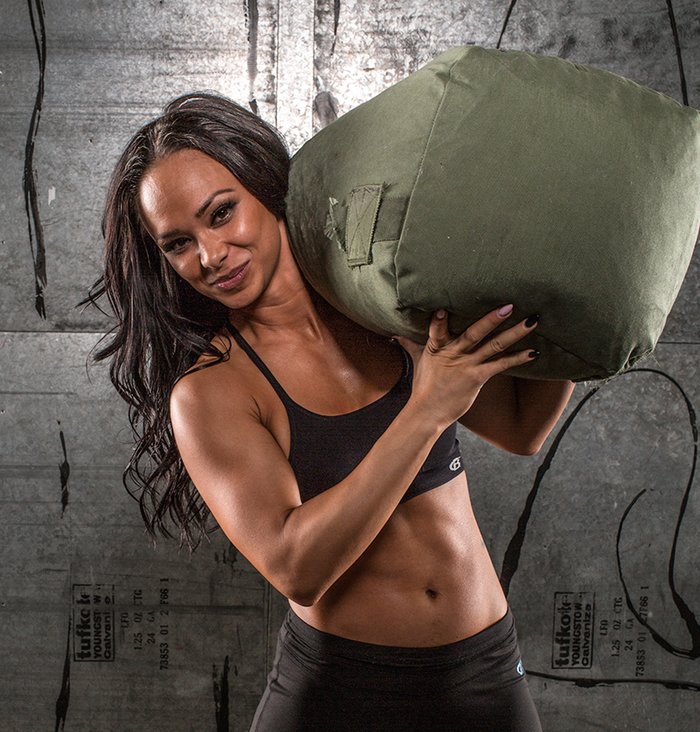
Spoiler alert: I'm not presenting a novel exercise here. In fact, this exercise has been around as long as we humans have walked this earth. In the past, it was the most effective way of getting children, food, and supplies from point A to point B. Today, strength coaches around the industry swear it's the best way to make tough, gritty athletes out of mere lifters. Depending on how you do it, it can fit seamlessly in either a muscle-building or fat-loss program.
The best part is that it requires next to no coaching, and you can start in any gym right now. I'm going to ask you to do two things to transform your physique: Pick something up, and start walking. If you can do this, you can accelerate your progress. Meet the weighted carry!
Keep Calm And (Weighted) Carry On
Yes, I said the weighted carry is as simple as picking something up and walking, but of course there are ways to do it wrong. Follow these technique musts to ensure you're safely and properly executing the exercise.
With a straight back and tight core, deadlift your weight or weights off the floor to a standing position. Just because you're not doing deadlifts for reps here doesn't mean you can slack on form.
If you're holding the weights at your sides, don't let the weights sag into your fingertips. Grip it like you mean it. Think about trying to crush the weight with your hands.
For every variation, be sure to keep your shoulders packed as you walk. Think about keeping a tall chest, slightly pinching your shoulder blades together, and keeping your eyes forward the entire time. Many people are surprised how much they "feel it" in their upper backs after performing carries.
As you walk, keep tension throughout your core by bracing. Think of the tension created when you cough, and recreate it during the carry. Take short and powerful breaths into your belly (not your chest), and keep tight.
Weighted carries can be done with a variety of items. Find something to pick up, and start walking!
Three Carry Variations To Try
What muscles does the weighted carry work? Pretty much all of them. A properly executed weighted carry works your body head to toe, but specifically, the postural muscles of the upper back—think traps, rhomboids, and lats—plus forearms, grip strength, and your core. Depending on which variety you choose and if you perform it bilaterally (two arms) or unilaterally (one arm), you'll also hit some muscles preferentially. Don't make the mistake of thinking that unilateral variations are any easier, either. Your obliques will tell you exactly why not.
You can use anything heavy to execute a weighted carry: dumbbells, kettlebells, trap bars, straight bars, sandbags, vests, and even odd objects like kegs, rocks, and cinder blocks. The possibilities are endless, but here are my three favorite variations:
1. The Farmer's Walk
This is the most basic of weighted carries, but also my favorite. Use a pair of dumbbells, kettlebells, or a trap bar, and deadlift the weight off the ground. Then walk. Only walk as far as you can with impeccable form—shoulders back, eyes forward, crushing your grip, and keeping your core tight.
Don't be shy. Challenge yourself and go heavy. As a goal, work up to doing farmer's walks with 50 percent of your body weight in each hand. It's OK to go even higher.
2. The Waiter's Carry
Take a single dumbbell, plate, or kettlebell, press or push-press it overhead, and walk. Follow the same basic form tips during this specific variation, and keep your shoulders square rather than leaning or tilting to compensate for the weight. Once again, walk as far as you can with impeccable form.
Because you only have weight in one hand, you'll have to utilize your core to an even greater extent to stabilize the weight overhead and yourself as you move. Remember to switch sides to give the other arm equal attention. These are fantastic for improving your shoulder mobility and overhead position for presses, by the way.
3. The Bear-Hug Carry
This is best done with odd objects like sandbags, punching bags, stones, and even bags of salt. In a commercial gym, you could hold a barbell in the crooks of your arms, similar to a Zercher squat, or a pair of kettlebells in a front-racked position. No matter what you choose, hug it tightly in front of you, and walk as long as you can. The more awkward the weight, the tougher these get—in a good way. Just don't expect breathing to be easy.
Keep from leaning back to support the weight. Stand straight and tall, and think about trying to touch the top of your head to the ceiling.
Weighted Carries And Your Workout
Want to get stronger? Pick up really heavy things and walk. Working on building muscle? Pick up heavy things and walk until it burns. Looking to lose fat? Pick up heavy things and walk until you're cooked. Regardless of your goals, weighted carries can help.
For muscle growth, the secret is using carries to increase time under tension. You may have heard that to maximally stimulate muscle growth, you need to include adequate amounts of muscle damage, metabolic stress, and mechanical tension in your training.1 Weighted carries hone in on the latter two, because carrying heavy objects generates a lot of tension and metabolite accumulation.
Add carries between sets. Because the goal is to maximize time under tension, use a weight you can carry for at least 45-60 seconds. Aim for 4-5 minutes of total time under tension your first week. Each week, increase the weight, total time, or both.
Adding carries into your muscle-building program is simple. Instead of picking up your phone between sets, grab some weights. If your grip strength starts failing, consider using a less grip-taxing version, such as the waiter's carry or Zercher barbell carry.
For a muscle-building bonus, hold your arms at a 20-degree angle away from your body. This will torch the deltoids and core and further layer on the muscle. You can thank me for the boulder shoulders and six-pack later.
If you're in the midst of a fat-loss phase, again, look no further than weighted carries. To maximize their effectiveness, consider adding them as a conditioning session on your nonlifting days.
Do your usual warm up, grab weights for carries, set a 20-minute timer, pick up the weights, and walk as much as you can before time expires. If you don't have to set the weights down during the 20 minutes, stop using paperweights.
You can do the same carry variation throughout the workout, but you'll probably be able to get more work done if you rotate between overhead, front hold, and farmer carries. In each case, select a weight you can carry for 20-30 seconds at a time. When your form breaks down or your grip starts to fail, set the weight down, recover, shake it out, and dive right back in. Rest as much as you have to, but only as much as you need.
Add a fat-burning finisher to the end of any style of workout by repeating the same format, but for 10 minutes rather than 20.
Stand tall, hold your form, and you really can't go wrong. Just keep calm and weighted carry on!
The BEST yoga poses for runners. Stretch your hips, hamstrings, quads, and back. Gain flexibility, and help prevent injury with this quick yoga sequence.
Unfortunately, summer here is Minneapolis is starting to come to a close. Every morning when I wake up it becomes just a bit cooler out for my morning run. Some days I even started wearing long sleeves!
Holloway Sportswear sent me a new pullover just in time, and it’s absolutely perfect for this in-between weather. It’s lightweight and not too warm. Perfect for morning runs!
One of the things I love most about the pullover are the thumbhole sleeves…am I the only sucker for anything with thumbholes?!
As I had mentioned a few posts back, with fall around the corner, it’s a time for everyone to get back into their “normal” routine. And part of my normal routine is getting to yoga classes.
With all the traveling I did this summer, I was not as consistent with my yoga practice as I would have like to have been. I normally go about 3 times per week, and I was lucky if I made it once a week…and my body can tell! My hips are tight and my low back is screaming to move more!
But, even though I wasn’t making it into class as much, I still did poses on my own to help me stretch out after my runs and at least maintain my flexibility.
I put together some of the best yoga poses to help YOU after your runs. These are the poses that saved me this summer, so I hope you enjoy!
Yoga Poses for Runners
Complete these poses after your run to help keep your muscles loose and to help prevent injury. No need to have a mat, just simply find a soft patch of grass and cool down after a long run. Hold each pose for at least 30-60 seconds.
Downward Dog – This is a great pose to stretch out the calves, hamstrings and lower back. Start in a full plank position on your hands. Then shift your hips back and up, keeping your back as flat as possible. Try to press your heels down, or “peddle” the heels one at a time to increase the stretch, one leg at a time. You should also feel a nice stretch in your shoulders and possibly even your chest.
Cobra – From your downward dog, shift forward back into a plank and lower all the way to the floor as if lowering into a push up position. Press firmly into your hands to peel your chest off the mat, either straightening the arms or keeping them slightly bent, depending on your flexibility. Aim to open the chest and pull your shoulders down and back. You should feel a stretch in the spine, but it shouldn’t feel like your “crunching” it, instead think about lengthening it.
Low Lunge with Twist – Start in a runner’s lunge with your RIGHT foot forward and your hands on the mat on either side of your front foot. Lower your back knee and shin to the floor. Then lift your RIGHT hand up to the sky, to rotate towards your knee. This will help to open the chest and stretch out your lower back, hip flexors, and hips.
High Lunge – From your low lunge, simply bring both hands back to the ground, and tuck your back toes under to lift the back knee off the floor back into your runners lunge. With control bring your hands up to your front knee. Then extend your arms up towards the sky, lengthening your spine. Sink the hips down to get deeper into the stretch. You should feel the stretch in your back hip flexor, and your front hip.
Side Angle Pose – Bring your hands back down to the ground with your RIGHT hand either on the outside or inside of your front foot (mine is pictured on the inside). With your RIGHT foot forward, twist open away from the front knee. Then reach your top arm to the sky or over head. Then lower your back heel to the floor slightly, rotating your toes to open out to the side as well. Think of lengthening through your spine and getting it as long as possible. You’ll also feel a nice stretch in your back inner thigh.
Triangle Pose – From your side angle pose, you can straighten the front leg to get a nice deep stretch in your RIGHT hamstring. Or you can come up to standing and reset your legs, then reach forward as you lower down into triangle pose. Continue to keep the length through your spine and to get your back as flat as possible.
Forward Fold – Stand up tall, with feet together, and take a few breaths to lengthen through your spine. Then when your ready, reach both arms behind your back and clasp the hands together. Hinge at your hips, then bring your arms up and over behind your back. You’ll feet a nice stretch in your hamstrings and your chest and the front of your shoulders. Allow gravity to pull the crown of your head lower to the floor to get deeper into the stretch.
Thread the Needle – Come down to the grass and lay on your back and cross your RIGHT ankle over your LEFT knee as if making a figure “4”. Keep your hips grounded and your lower back pressing into the mat. Pull the LEFT knee in towards the chest, then thread your RIGHT hand between your legs. Clasp your hands underneath your LEFT knee to help pull the knee deeper into the stretch.
Half Splits – Come back into a runner’s lunge position with the RIGHT foot forward, and lower the back knee down to the floor. keeping the hands on the ground, shift the hips back to straighten the front leg. Flex through the front foot to get a very deep stretch in the front leg. Focus on pulling the RIGHT hip back and shifting your torso over your front leg. To deepen the stretch, keep the back as flat at possible.
Half Pigeon – Come back forward into your runner’s lunge and both hands on the mat on either side of your front foot. With most of the weight in your hands, slide your front foot over towards your LEFT hand. Lower your knee to the mat over to the RIGHT. Place the outside of your RIGHT calf on the mat so that it’s parallel to the front of your mat. Then, slowly lower your back knee and shin to the floor. Square your hips as much as possible to the front of the mat. For a more moderate stretch, keep your arms straight and hands flat on the floor. To increase the stretch, you can lower to your forearms, or lay your torso down over your front leg. You should feel the stretch on the outside of the RIGHT hip and in the glutes.
Make sure you complete all the single sided poses on the OTHER side as well. I like to run through the entire sequence a seconds time on the other side. That way I can get a bit deeper into some of the poses.
FitGirlDiares: Aerial Yoga! - Beginner's Tips Total Body Relaxation Stretch The PERFECT 20 Minute Yoga Flow Original article and pictures take thelivefitgirls.com site
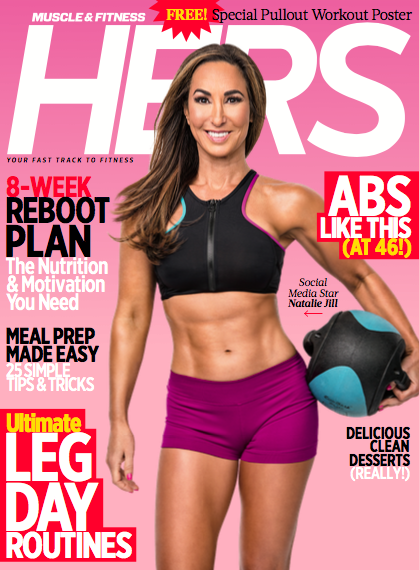
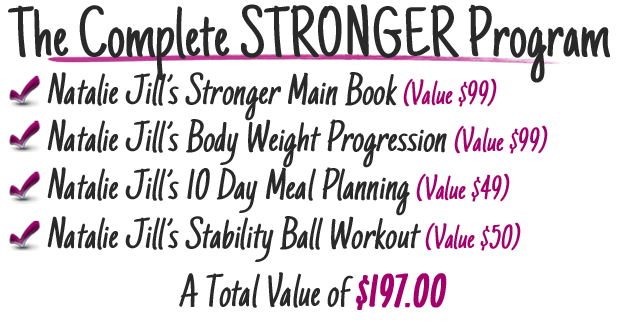
It is here! Stronger, the most complete strength building and Fat Loss program that will get YOU in the BEST shape of your life! It is the SAME program I followed that landed me on the cover of Muscle & Fitness HERS at age 46! (Use code HERS40 (all caps) to save $40!)
Hi, I’m Natalie Jill and for those of you who don’t know me yet, I am a full time working mom who just turned 46, and I have helped millions of people just like you get happy, healthy, and fit!
Don't worry, even though I have millions of social media followers, I have the credentials to back things up.
I'm a Licensed Master Sports Nutritionist and a functional fitness trainer. I’m the creator of the Bestselling 7 Day Jump Start™ system, that has helped over 100,000+ people just like you get in shape.
With SO many programs and so much information overload available on the market, it can be SO confusing.
That is exactly why I have SIMPLIFIED all of this for you in my new program which is designed for ONE thing...to get you quick and lasting results based on body weight exercises and “CRN” .
What is CRN you ask?
CRN is Craving Resistant Nutrition and it is KEY for overcoming the reliance on 'willpower'.
If you aren't constantly 'hungry' or 'starving' then you are not forced to rely on willpower to 'not eat' when your body is telling you to eat!
Best of all, Craving Resistant Nutrition is based on REAL food, and you don't need any expensive pills or gimmicks to make it happen.
No weights or machines, no fancy gyms required, NO expensive trainers and NO special supplements or fancy food required on this program. Only REAL wholesome foods and your own body weight.
What makes STRONGER different?
There are 5 keys to help YOU get LEAN!
Number One: The FORMULA!
With STRONGER, I have figured out the formula to reverse the aging process with the exercises and nutrition that you will learn throughout this program.
I’m going to show you my TOP moves for creating that defined flat belly without calorie restriction and long drawn out cardio.
Number Two: It is EXTREMELY TIME efficient
With STRONGER, in less than 30 minutes of working out a day, you will learn how to maximize your RESULTS utilizing just your own body weight.
You can do the entire workout in less time than it used to take you to drive to and from the gym!
Number Three: Bodyweight exercises
Throughout the program you will learn to use proper FORM that will help prevent lower back pain while getting you functionally fit.
The workouts will engage ALL muscles and avoids creating muscle imbalances.
You do NOT need expensive trainers, gyms, or heavy weights to CHANGE your body.
I included OVER 30 videos to help you get the most out of the program!
Number Four: FAT LOSS
The eating plan will get you rapid and lasting results. Even if you never considered yourself an athlete, you will be using the same formula for SUCCESS that athletes use!
The reasons athletes look the way they do is because of the way they train and how they eat. You will be eating natural, unprocessed foods that will keep you satisfied and help you avoid cravings, while losing fat, and feeling energetic!
The Craving Resistant Nutrition combined with the intense progression training will maximize fat loss and get your body doing things you never thought were possible!
Number Five: No More Hunger or Cravings
On this program there are never specific times that you have to eat. You can eat when you are hungry and when it is convenient for YOU. You will eat yummy foods that will leave you feeling satisfied.
Program includes 10 days of meal planning examples (including some yummy recipes) and there is no restrictive measuring or deprivation dieting.
Stronger will teach you a non-restriction based way to eat which involves ADDING more of the right foods so don’t have to focus on calorie restriction, deprivation, and will-power. No fads, magic pills, or instant fixes here!
Imagine this:
You lose FAT
You gain ENERGY
You gain STRENGTH
Oh and you get STRONGER...and feel empowered!
Are you IN?
Are you ready to do this with me?
Decide you are ready to do this.
Get Stronger with me TODAY!
Let’s go!
Original article and pictures take www.nataliejillfitness.com site
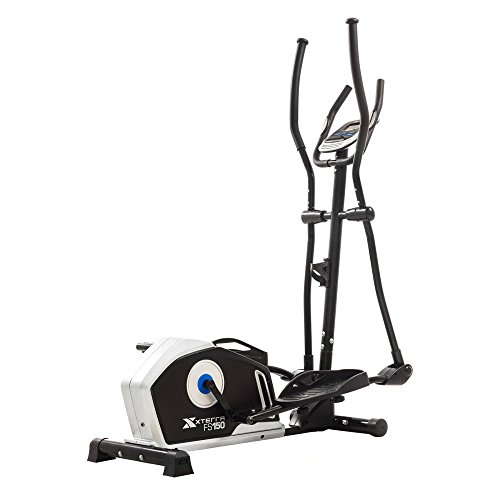
Treat yourself to the smooth total-body workout you deserve with the Xterra Fitness FS150 Elliptical. Features a real-drive belt-driven system that remains friction-free and synchronizes your body mov… Read more…
Original article and pictures take startdominating.com site
Set up a cable station with a straight bar attached to the top pulley.
Sit on the seat facing the station. Keep your feet flat and planted firmly on the floor.
Using an overhand grip, hold the bar as wide as comfortable. (Your hands should be about 1 1/2 – 2 times body width apart.)
Lean back slightly without arching your back.
Pull the bar towards the top of your chest using your shoulders while arcing your elbows out to the sides of your body.
At the end of the movement squeeze you shoulders together slightly and hold for a count of one.
Return to the start position by arcing your elbows forward while relaxing your shoulders.
Repeat.
Seated / Low Cable Back Rows
Connect a V-bar attachment to the low pulley on a cable station or cable rowing machine.
Sit down at the station and place your feet on the foot pads or crossbar provided, while keeping your knees slightly bent.
Lean forward, keeping your back straight and grip the V-bar handles with both hands.
Keeping your arms fully extended pull back until your torso is at a 90-degree angle from your legs.
Your back should be slightly arched, with your chest should be pushed out. This is the start position.
Keeping your torso stationary, pull the handles back towards you while squeezing your back muscles.
Keep your arms close to your sides until your hands reach your abdomen. Exhale as you perform this movement.
Hold for a count of one.
Inhale as you return to the start position in a smooth movement.
Repeat.
Do not swing or rock back and forth as you perform this exercise. Doing so can cause lower back injury. You can perform this exercise using a straight bar instead of a V-Bar. You can use an underhand or overhand grip.
Barbell Deadlifts
Place a barbell in a clear space on the floor. (Make sure there are no obstructions in your way.
Stand facing the barbell with your legs about 4-6 inches from the bar.
Place your feet shoulder width apart.Your feet can be pointed straight ahead or turned outwards slightly.
Squat down, keeping your back straight and grip the bar with an overhand grip at shoulder width.
Keep your arms fully extended and stand up with the barbell.
As you lift the barbell, your hips and shoulders should rise together and your back should be straight.
As you reach the top of the lift and are standing straight, rotate your shoulders back slightly until you feel a slight stretch in them.
Lower the barbell back to the floor in the same squatting motion you used to lift it.
This exercise can be very dangerous if performed incorrectly. If you are a novice, only perform this exercise with an experienced trainer's supervision.
Single / One Arm Dumbbell Bench Rows
Place a dumbbell on each side of a flat bench.
Place your right knee on the end of the bench.
Bend your torso from the waist until your upper body is parallel to the floor, while placing your right hand on the bench in front of you for support.
With your left hand, pick up the dumbbell with an overhand grip. The palm of your hand should be facing into you.
Keep your lower back straight. This is the start position.
Using your back muscles, pull the dumbbell straight up to the side of your chest, keeping your upper arm close to your side. Exhale as you do so.
At the top of the movement, hold for a count of one and squeeze your back muscles.
Return to the start position inhaling as you do so. Repeat.
Complete all repetitions for one side before switching sides.
This exercise can be performed using a cable station, with a stirrup handle attached to either the high or low pulley.
Straight Arm Pulldowns / Pull Downs / Pullovers
Stand with feet shoulder-width apart. Keep the lower back straight and the core tight. Reach up and grab a pull-down bar with a wide grip.
Keeping your arms straight with a very slight bend in the elbow, pull the bar down to your hips. Breathe out and flex your lats as you do so.
Pause and slowly return to the top of the movement. Do not let the weight rest against the stack. Repeat the movement.
Bent Over Barbell Rows
Set up a barbell on the floor and stand facing it with your legs slightly wider than shoulder width apart and your knees slightly bent.
Bend forward at your waist and grip the barbell with an overhand grip.
Keep your back straight and nearly parallel to the floor.
Keep your head and neck straight. This is the start position.
Without moving your torso, exhale and lift the barbell up towards you.
Keep your elbows close in to your bodyand use your forearms to support the weight.
At the top of the movement, hold for a count of one and sqyeeze your back muscles.
Return to the start position inhaling as you do so.
If you suffer from lower back problems, this exercise is not recommended. Always keep your back straight throughout this exercise. This exercise can be performed using an underhand grip to engage the triceps also.
Back Extensions / Hyperextensions
Lie face down on a hyper extension bench with your upper thighs and lower hips on the support pad. You must be able to bend at the waist freely.
Lock your ankles under the footpads.
Start with your body in a straight line head to toe.
Place your arms across your chest, behind or at the side of your head.
Slowly bend forward by relacing your, back and abdominal muscles.
Continue as far as possible without rounding your back or raising your thighs from the support pad. You should feel a slight stretch in your hamstrings.Hold for a count of one.
Return to the start position by contracting your back and abdominal muscles until your body is once again straight. Do not arch your back up at the end of the movement. Pause and repeat.
As your strength and flexibility increase, you can hold a weight plate against your chest for extra resistance.
Pull-ups
Standing under a pull up bar, reach up and hold onto the bar with an overhand grip. Make sure your hands are about twice your shoulder width apart.
Keep your arms straight and hang from the bar so that your arms are taking all of your weight.
Keeping your body straight and not swinging your weight, pull your body up towards the bar by pulling your elbows down towards your torso at an angle.
Continue lifting until your chest is nearly touching the bar. You should feel a “squeeze” at the base of your lats (about midway down your back and to the side) as they contract.
Once your lats have completely contracted at the top of the movement, slowly lower your body to the starting position.
Repeat.
By using a wide grip, your lats are doing most of the lift, rather than your biceps. It doesn't matter if you keep your legs straight or bent at the knees with your feet crossed. The important thing is that you do not use your legs to assist in lifting your body weight. As your strength increases, you can add weight by using a weight belt.
Dumbbell Incline Bench Rows
Lean forward into an incline bench
Using a neutral grip, hold a dumbbell in each hand so your palms are facing in.
Your arms should be fully extended and hanging straight down. This is the start position.
Pull your shoulder blades back and flex your elbows to pull the dumbbells up to your sides.
Hold and squeeze your shoulder and back muscles.
Return to the start position in a slow, controlled movement.
Repeat.
Barbell Good Morning
Using a squat or barbell rack, set the barbell at shoulder height.
Position yourself so the barbell is resting on your shoulders and you are facing away from the rack.
Stand up to lift the barbell clear of the rack and take a few steps away from the rack.
Position your feet slightly less than shoulder width apart.
Keep your legs straight and bend forward at the hips.
Continue bending forward until you feel a mild stretch in your hamstrings. (Do not try to bend past the mild stretching sensation. As flexibility increases so does the range of motion.) Hold for a count of one.
Return to the starting position by straightening from the hips. Repeat.
Start with lower weights when performing this exercise for the first few times to allow your body to adapt to the movement. This exercise can also be done with your knees slightly bent to emphasize use of your glutes.
Liked this workout?
Find the perfect plan for you at
Original article and pictures take workoutlabs.com site
Workout Routines Created at http://www.tagxedo.com/app.html
Plan it out
Many people are unsure where to start when it comes to exercising and have lots of questions.
It doesn't matter if you want to exercise to help you lose weight, if you need a tailored plan because you are pregnant, or if you want an exercise routine that will suit a beginner, first off before you worry about the specifics everyone needs to plan out when and where, and possibly with who, they will train.
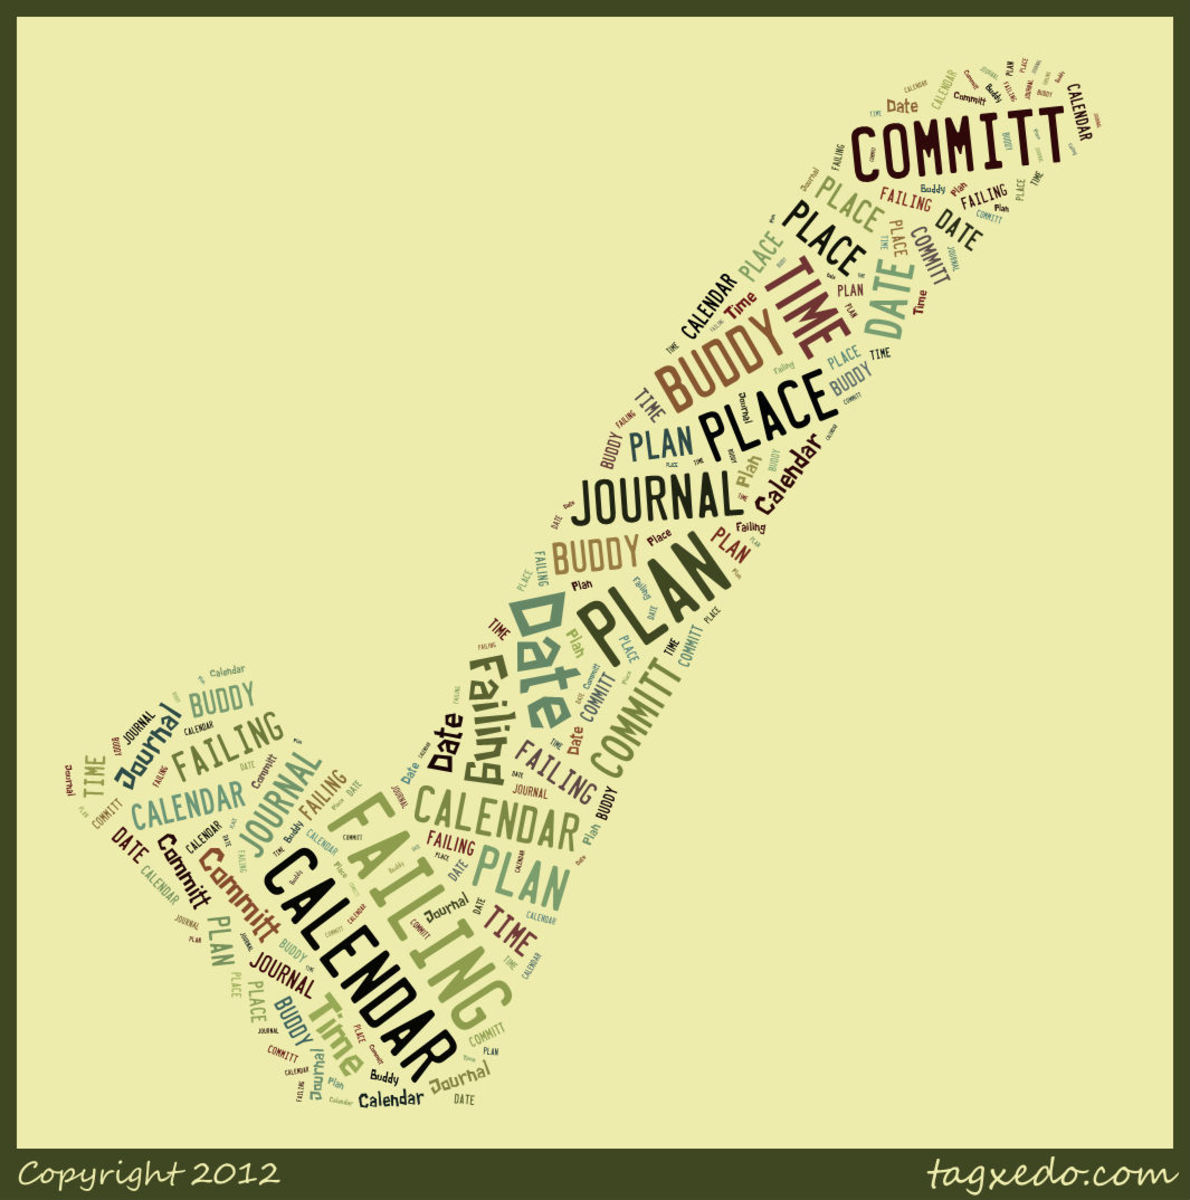
REMEMBER: FAILING TO PLAN IS PLANNING TO FAIL
Make a couple of dates with yourself every week, add them to your wall calendar, your phone or your outlook, this is an important appointment and therefore you should ensure it is prioritised and not double booked. Let everyone know that at these specific times every week you are engaged.
Where you're at
The workout routines provided in this hub can be completed at home, in the gym or outside. The exercises can be modified to make them easier or harder and so should suit all fitness levels.
But before you jump straight in you need to be honest about how fit you currently are. For instance, have you ever exercised on a regular basis or are you a complete beginner?
If you already have a certain level of fitness perhaps you want to consider using weights when possible during the routines, where as if you are a complete beginner just do what you can with resistance bands or your own body weight,
NOTE: IT IS MORE IMPORTANT TO COMPLETE ONE EXERCISE WITH GOOD FORM, NO ADDED WEIGHTS AT A GOOD TEMPO THAN TO BANG OUT 20 REPS AT SPEED HOLDING HEAVY WEIGHTS AND CAUSE YOURSELF AN INJURY IN THE PROCESS - LEAVE YOUR EGO BEHIND!!!
Beginners
I suggest that beginners should start by completing 2 or 3 all over body workouts a week. This way you will not overload any one muscle group.
There are 2 all over body workouts detailed in the hub linked below. They should not be completed on consecutive days and you should try to alternate them as they provide different exercises for the main muscle groups; Back, Chest, Legs and Shoulders.
Each workout should take approximately 20 mins. You should warm up and cool down for 5 mins either side. Your warm up can be as simple as walking up and down a flight of stairs while circling your arms, all you need to achieve is getting the blood flowing through the muscles. While your cool down should consist of some static stretches.
Intermediate
So you are used to working out but want to try something a bit more challenging, why not give the overload circuit, outlined in the linked hub below, a go.
An overload circuit is different in that you overload one particular muscle group. This is opposed to exercising one muscle group directly after the other, as detailed in the beginners full body workouts.
This is a tough circuit so ensure you warm up fully beforehand, but it requires very little equipment making it possible to do in the house. You will need a floor mat (or thick blanket) and an exercise step (a stair will do for most of the exercises).
Advanced
When you have been working out for a long period of time full body workouts may just not be getting you the results anymore as your body becomes accustomed to them. Splits routines could be what you are looking for, with a split routine you will work only certain muscles during each workout and then concentrate on another group the following day.
An example split routine could be back and biceps on Monday, followed by chest and triceps on Tuesday, rest day Wednesday, legs on Thursday, shoulders on Friday, rest days Saturday and Sunday.
There are some example hubs for split day routines linked below. The first one targets the glutes, which are an important muscle group, with many fitness professionals training them in isolation. Warming up beforehand with sprints or hill runs can really help to jump start your fitness routine. The second hub is a back work out, it is described as a heavy back workout but you can tailor it to suit your own needs. If you want to work heavy aim for the prescribed 6-8 reps, if you are only beginning to lifting weights you will be aiming more for the 10-15 rep range, if you want to use the workout as more of a cardio session then aim for the 15-20 rep range.
Original article and pictures take hubpages.com site